How Long Does Asphalt Paving Last?

Asphalt Paving Charleston SC can significantly impact how long it will last. The mix, thickness, and compaction of the asphalt all affect how long it will hold up to traffic and weather elements.

Look for a paving contractor offering these services to ensure you get a good quality job.

asphalt paving

Asphalt is a popular choice for paving because of its durability. It is a highly versatile material that can be used for roads, driveways, and parking lots. Compared to concrete, which cracks easily due to cold weather and water damage, asphalt lasts much longer. A well-maintained asphalt surface can last up to 40 years or more.

One of the reasons for asphalt’s durability is its strength and ability to withstand heavy vehicle traffic. It can withstand repeated cycles of loading and unloading without suffering significant damage. However, it’s important to keep in mind that the durability of asphalt is influenced by environmental factors, such as temperature, rainfall, and sun exposure.

When mixed with the right amount of aggregate, asphalt can withstand high temperatures. However, if the pavement is exposed to extreme temperatures for long periods of time, it can weaken its structure and lead to premature failure. Heat can also cause asphalt to oxidize, which reduces its stiffness and resistance to deformation. This can also cause the pavement to become rutted and damaged.

In order to prevent this, contractors can use an additive that increases the stiffness of the asphalt mixture. Various materials have been used for this purpose, including recycled rubber, crushed glass, and treated swine manure. This additive is expensive, but it can greatly improve the durability of asphalt pavements.

Another way to increase the durability of asphalt is by increasing its in-place density. While higher densities are typically only achieved in high-quality, newer construction methods, they can help to extend the life of asphalt pavements by preventing bottom-up fatigue distress.

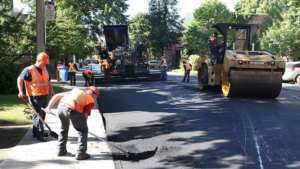
The process of laying down asphalt starts with grading the site. Contractors slope the pavement toward grassy areas to help drainage and prevent water buildup underneath the pavement. The next step is to put down a base layer, which is made of dense, load-bearing aggregates. A binder layer is then placed on top of this. Typically, this is made of finer, more compacted asphalt.

In addition to ensuring that the asphalt meets specifications and quality standards, testing is done throughout the mixing process to check for proper consistency. This allows the contractor to make adjustments as needed and ensure that the pavement will be able to meet its intended function.

Asphalt might seem dull at first glance, but it has a dark beauty that stands out against concrete buildings and landscaping. It’s sleek surface is also easy to clean and resists stains and damage better than some other paving materials. With its ability to be easily modified, asphalt offers design flexibility and a range of creative solutions that can make your commercial property more visually appealing.

The basic composition of asphalt includes stone (aggregate), sand, additives and liquid asphalt or bitumen to hold the aggregates together. These ingredients are mixed in batches at special processing plants. Plant operators measure and blend the ingredients based on the specific climate at the project site. Hot mix asphalt is typically used for high-traffic areas and provides superior durability. Cold mix asphalt is less expensive and suitable for smaller projects.

Another unique attribute of asphalt is its noise-reducing properties. The material is quieter than other paving options, such as concrete, because it absorbs sound instead of reflecting it. Its acoustic qualities are a major contributor to why it is often used on roads and highways.

With its innate beauty and range of design options, asphalt is the perfect choice for any outdoor space. Whether it’s a parking lot, road or other walkway, it can add style and sophistication to any business. Its versatility also makes it an attractive option for public spaces, allowing for easy-to-read signage and eye-catching colors that will attract customers to your business.

Asphalt can be customized to meet your specific aesthetic needs by using a variety of sealing, crack filling, resurfacing and line painting techniques. By adding these features to your pavement, you can customize its appearance and extend its longevity. For example, you can seal asphalt to protect it from water, oil, and sunlight. Asphalt surface treating also helps reduce its permeability and improves traction.

Asphalt is a budget-friendly material that provides great value to your property. The comparatively low cost of asphalt makes it an ideal option for residential driveways, sidewalks, parking lots and roads. It also looks beautiful and lasts longer than other paving materials such as concrete. Asphalt paving requires regular maintenance to keep it looking good and functioning properly. Regular sealing and repairs to cracks and holes will ensure your pavement retains its beauty for a long time.

The material is easy to work with and does not require as much labor as concrete. It is also more affordable to maintain because it is less prone to cracking. Asphalt pavement can be easily repaired using a special crack filler that is available at your local hardware or home improvement store.

This product works by bonding the cracks with an adhesive substance, which will help prevent water from seeping through to the sub base. This will prolong the life of your asphalt surface and prevent costly repairs in the future.

Another benefit of asphalt is that it dries quicker than concrete. This means you can get back on your road faster and avoid the orange barrels and lane closures that are usually associated with other types of paving projects. It is also a more environmentally friendly material since it uses recycled materials and produces less fumes during paving.

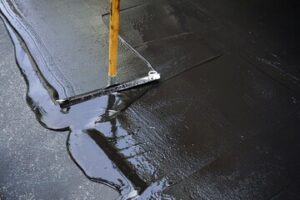
Asphalt is made up of stone (aggregate) sand, additives and liquid asphalt (petroleum). Liquid asphalt is what holds the aggregate together. The mix is heated at an asphalt plant to make it hot and then transported by dump trucks to the paving site. It is kept hot during the entire paving process to prevent it from cooling, which would cause it to lose its binding properties.

Cold asphalt mixes are used for patching and lesser-trafficked service roads. These are produced by emulsifying hard grade blown bitumen in water with an emulsifying agent. This mixture stays soft in cold temperatures and repels water, which is why it is primarily used for pothole repair. This type of asphalt is not as durable as HMA and has a shorter lifespan, but it offers similar benefits to homeowners.

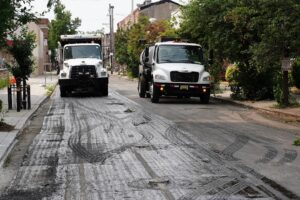
The asphalt paving process requires the use of power machinery and heavy equipment, so safety is always a priority. Workers must wear proper personal protective equipment to avoid exposure to physical, environmental and chemical hazards.

Typical PPE includes thermally-insulated gloves, coveralls and boots, to protect the skin from contact with hot materials. It’s also important to keep a fire extinguisher nearby, preferably rated type B or ABC. It should be easily accessible to employees.

Asphalt contains petroleum, so it is flammable. It’s important to avoid smoking and using open flames near the asphalt. Make sure to have a firebreak in place if the area gets too close to a flame source. Workers should also be careful around electrical lines, which could cause an electrocution if they are touched.

Working with asphalt is hazardous because it’s extremely greasy and sticky. If it comes into contact with bare skin, it can burn the skin and irritate the eyes and respiratory tract. It can also soak into clothing, which can leave behind toxic stains and odors.

Paving should be done in dry conditions with moderate temperatures. Extreme temperatures can make the asphalt too soft to work with, while extreme cold can prevent it from curing properly. Workers should look out for potential tripping hazards, like manholes and catch basins, and mark them clearly. It’s also important to check the weather report before starting a project, as rain can affect the quality of the finished product.

The first step in the paving process is to grade the road. Contractors slope the surface to allow water to drain away from the road and prevent it from sitting on the asphalt. A sub-base layer is then laid, which consists of crushed stones that are typically mixed with bitumen. This helps reduce rutting by evenly distributing traffic and environmental loads.

The binder course is then put down, which provides stability by combining qualities of durability and stiffness. It should be designed to withstand the highest shear stresses to minimize rutting, while still allowing sufficient stone-on-stone contact and a flexible base layer.

Preparing Your Asphalt For Sealcoating

Sealcoating is an inexpensive way to dramatically extend the life of your asphalt driveway or parking lot. It restores the deep black appearance and forms a protective barrier against UV rays, water, oil and other oxidizing substances.

Sealcoating

Before sealcoating, fix any damage in the pavement. Untreated damage will only get worse, requiring expensive repairs.

The preparation process for sealcoating is a critical step to ensuring success. The surface must be free of oil, chemicals, gasoline and other petroleum-based substances that can interfere with the sealer. This can be done with power washing and sweeping equipment, or a blower. If these fluids are left on the pavement surface, they can damage the bond between the asphalt and the new coating.

Before applying the sealer, it is important to choose a high quality product and mix it according to the manufacturer’s specifications. This is especially true for sand-based sealcoating mixes, as they require constant agitation to maintain consistency and prevent clumping. The sand also helps add texture to the surface, making it less slippery. This is an additional benefit that can reduce liability in parking lots, where slippery surfaces can lead to accidents and injuries.

The process of sealcoating is most effective on asphalt surfaces in good condition. It will not repair or restore cracks or dry patches of asphalt, so these areas should be repaired before the sealing process begins. The seal coat should be applied in layers that are thick enough to protect the asphalt from sunlight and moisture. If the sealcoat is applied too thin, it will allow the sun’s UV rays to penetrate and degrade the asphalt binder.

Sealcoating also helps to improve the visual appeal of your driveway or parking lot. Over time, the sun can make asphalt appear washed out and gray. Seal coating will help to restore the asphalt’s deep black appearance and will also protect the pavement from moisture and oxidizing substances.

Unsealed asphalt can become brittle and crumble, leading to potholes. Sealcoating will help to block out elements that cause oxidation, such as water and motor oil, and can keep the asphalt binder flexible for a longer period of time. This will help to prevent the formation of potholes, which can be extremely dangerous for pedestrians and vehicles. It is recommended that you have your pavement sealed every few years, in order to maintain the best possible function and visual appearance.

Application

Before a contractor can begin the sealcoating process, they must first assess the asphalt surface. They look for oil stains, cracks, potholes, and other areas of damage that need immediate repairing. After the assessment is complete, they must block off the area that will be treated and clear the pavement of any debris using brooms or blowers. A thoroughly cleaned surface will allow the sealant to bond properly with the asphalt.

During this time, the crew should also fill any potholes in the asphalt with an asphalt patch material before applying the sealcoat. Once the patching is done, it’s important to wait 24 hours before driving over the area again. The sealcoat will take this period of time to dry and cure, dependent on weather conditions.

The next step is to mix the sealcoat material. The contractors can choose to spray the product or squeegee it onto the pavement. Both methods have their pros and cons, but spraying is more efficient since the crew can cover larger areas in a fraction of the time it would take them to use a squeegee. However, there’s a chance that the spray method could cause the crew to miss spots and apply a thinner coat.

There are two types of sealcoat materials: coal tar-based and asphalt emulsion-based. The former is more durable, but it can be environmentally hazardous and has legality issues in some regions. The latter is safer and is a combination of asphalt cement and water. It also contains additives that help it resist oxidation, water damage, and other elements.

As the sealcoat dries, it creates an invisible barrier over the asphalt that protects the surface from harmful environmental factors. It also helps to stop the sun’s UV rays from deteriorating the asphalt. It will slow down oxidation, extend the life of the asphalt, and keep it looking new for a long time.

The sealcoat is usually applied in two coats and requires a minimum of 24 hours to dry. After the drying and curing process, it’s important to protect the newly-applied sealcoat from traffic, rain, dirt, and chemicals. Regular maintenance will prolong the life of the sealcoat, including periodic resealing and repairs.

Maintenance

Seal coating is a cost-effective maintenance option for asphalt pavement. It protects against oxidation, stops weather damage and beautifies the surface. A quality sealcoat can extend the life of a driveway or parking lot for years. However, the process is labor intensive and must be done properly. A professional company is best suited for the job.

Pavement needs to be clean and dry to ensure proper adhesion of the seal coat. Effective cleaning methods include blowing and sweeping. However, it may be necessary to use a power washer for stubborn dirt and oil. It’s important to avoid using harsh chemicals that can harm the asphalt.

A properly maintained driveway will increase the value of your home and make it more aesthetically pleasing. It will also reduce the risk of accidents and injury. A slick driveway is dangerous for cars and pedestrians, and seal coat adds friction to the material to help prevent slippage.

The most common reason for applying a seal coat is to restore the appearance of faded asphalt. The sun’s UV rays break down the carbon bonds in asphalt, which causes it to turn gray and wash out over time. A Pittsburgh driveway sealer can restore the pavement’s original, jet black appearance and improve the curb appeal of your property.

Asphalt is a combination of rock and stone and gravel held together with a binder, which is a petroleum-based substance. When this substance degrades, the aggregate becomes brittle and begins to crack. The deterioration of asphalt surfaces can be slow and gradual, but it will eventually cause permanent damage. Sealcoating can prolong the lifespan of asphalt by protecting it from harmful chemicals, rain and UV rays.

Besides beautifying your driveway or parking lot, it can increase the resale value of your home and save you money on fuel costs. It also helps to prevent potholes and other costly damages. To get the most out of your asphalt, it should be sealed every two to three years.

The ideal time to perform a seal coat is during the spring through fall. This is when temperatures are warm and there is a low chance of rain. However, it’s important to check the forecast regularly as conditions can change at any time.

Cost

Sealcoating is a relatively inexpensive maintenance procedure that prolongs the life of asphalt surfaces. It costs a fraction of the price of completely replacing the surface with blacktop. Additionally, it helps to prevent more expensive damage to your pavement by blocking moisture that would otherwise exacerbate cracks and potholes.

The cost of sealcoating varies depending on your location, the type and thickness of sealant you choose, and the size of the area being coated. Typically, the more asphalt that needs to be sealed, the higher the cost will be. It also depends on whether you want to add color to the sealant, which can raise the cost by a significant amount.

Before any sealing takes place, your driveway or parking lot must be free of cracks and crevices. This will require making repairs that are usually done by a separate contractor. If you have these repairs made before you have the asphalt sealed, it will significantly reduce the overall cost of the job.

Once the preparations are complete, your professional seal coating contractor will apply one or more coats of asphalt sealer. It is important that the sealant be allowed to dry overnight for best results. The drying time will help the new coating to bond with the existing blacktop and create a smooth surface that is impervious to weather, oils, and chemicals.

During the process of applying the sealant, your driveway or parking lot will be power washed to remove any dirt and oily debris that is present. It is essential to clean the asphalt thoroughly before seal coating to ensure that the new material will bond properly with the old surface. A gas blower, degreaser, scrub brush, and water hose should be used to accomplish this task.

Before choosing a sealant, consider the types of pavement your property has and how much traffic it will receive. The most common and least expensive option is coal tar, which holds up well to the elements and blocks UV light. Other options include rubberized asphalt and acrylic seal, which are more expensive but offer greater flexibility and are environmentally friendly.

Tips To Help You Understand Social Media Marketing

Many people say that social media marketing is the key to success in the marketing arena in the 21st century. While social media marketing can be effective, it is unfortunate that so many people do not know where to start in creating a social media marketing campaign. 

This article contains tips to begin using social media marketing to your advantage.Many people say that social media marketing is the key to success in the marketing arena in the 21st century. While social media marketing can be effective, it is unfortunate that so many people do not know where to start in creating a social media marketing campaign. This article contains tips to begin using social media marketing to your advantage.

Remember to speak to your potential customers as people. You may run a business or corporation; however, this does not mean you need to speak like one. Trust is built from personal relationships. If your potentials see you as a person who cares about their needs and how your product meets them, it will go a long way in establishing this trust.

Determine if you really want to establish a relationship with customers. Advertising through channels that are social and keeping it simplistic are the keys to driving sales. If you actually want to build a loyal customer base who repeatedly comes back and buys from you, you’ll have to begin the conversation with them by introducing yourself. Your customers will tell you want they want once you take the first step.

As was mentioned at the beginning of this article, social media marketing is a growing tend and many people are looking to leverage it in order to grow their business. However, social media can be daunting to some people who don’t know where to start. Apply this article’s advice and be on your way to using social media marketing with ease.

You can also visit our other websites and post your article.

Henderson Carpet Cleaning, Homes Healthy, Lancaster Concrete Design, Locke Home Inspection, Quality Construction And Remodeling, Tactical Trading Signal, Update Construction, Front Range Seamless, Burrlenton Architecture, E Marketing Extreme, Marketing-Maneuvers, Chelsea Home Builders, Healthy Beauty Pledge, Deck Builders Ames, Long Distance Movers California, Omaha Mold Removal Services, Lewis Lutz Trick Out Window Tinting Trick, Buy SEO Service, Article Marketing, Geek Travel, Elkhart Garage Door Services, Airduct Omaha, Hollywood FL Carpet Cleaning, Merilyn By Moonlight, Society Hill Play House, 123 Your House, Xpose your Business, Portrait-Photography-Tips, Traveler Talk, Fort Worth Concrete Service, Top Professional photography, Dallas Weddings Photographer, James Wellman Photography, Jenny Hindley Photography, Tri State Wedding Photographer, Hay Photographers, Schaumburg Towing Service, Branham Photography, New Jersey Painting and Powerwashing, Quality Construction and remodeling, Arts And Architecture Collection, Paul Lawton Construction, Boral Pavers, My Restoration Directory, Draw Inspiration From Expert Painters, Polycor-Countertops, Charlotte Interior Design, Bobs Towing And Transport, Cosmetic Dentist Anchorage

Geotechnical Factors That Affect the Performance of Pavement

Pavement is designed to transfer wheel load stresses from vehicles to the subgrade. Most of the geotechnical factors that affect pavement performance relate to stiffness and strength.

Pavement

The sub-grade is the underlying ground upon which all other pavement layers will be constructed. It is the most important of all the pavement construction layers, as it is responsible for transmitting vehicular load stresses to the base course and the surface layer(s). The sub-grade should be made of a material capable of supporting the loads without causing deformation or settlement problems. This material may also need to be stabilized in order to provide a suitable foundation for the rest of the paving construction.

A capping layer is usually placed on the sub-grade if the soil is structurally weak or is expected to be subjected to exceptional loads. The capping layer is typically a selected fill material, generally a crushed rock, placed in layers no greater than 225mm thick and thoroughly compacted before placing the next layer. The engineer will determine the thickness required to adequately support the anticipated traffic loading.

Generally, the sub-grade should not contain silt or clay and be free of organic materials as these will decompose under the heavy construction loads. Sub-grade should be properly graded to ensure a smooth, level and even surface.

If the sub-grade soil has insufficient strength for the proposed traffic loads it can be improved by blending in lime or Portland cement or by treating with asphaltic binder and thorough compaction. In addition, the soil can be stabilized by incorporating a geosynthetic or other material. These products are designed to prevent moisture intrusion or expulsion and reduce swelling tendencies.

A simple way to check the moisture content bearing capacity of a soil is to squeeze it in your hand; if it stays together and has powdery texture then it is too dry and needs to be moistened, while a ball that breaks apart readily indicates that the sub-grade soil is at its optimum moisture content.

There are various laboratory tests that can be used to evaluate the strength of a sub-grade; these include the CBR test, falling weight deflectometer, and indirect shear testing. However, these are costly and labor intensive and are only able to evaluate a small sample area. For this reason, most engineers use their engineering judgment to establish limits and quantities of sub-grade stabilization based on subsurface exploration results and proof rolling evaluations.

Base Course

The base course is a layer of specified or selected material of designed thickness placed on the subgrade (or on the unbound granular base if a subbase is not used) to provide a uniform and stable support for the binder and surface courses. It typically provides a significant portion of the structural capacity in flexible pavement systems and improves foundation stiffness in rigid pavements. It also minimizes intrusion of fines from the subgrade into the pavement structure and improves drainage.

A high quality granular or crushed rock aggregate is generally used to form the base. The aggregates may be used as-is or treated with various stabilizing admixtures to increase the strength and stiffness of the base material and/or to help reduce the total pavement thickness for cost savings. For example, the base may be treated with Portland cement, asphalt emulsions, lime or flyash to increase its strength, density and/or porosity.

Whether or not the base is bound with bitumen, it must be densely compacted to achieve proper load distribution and improve drainage characteristics of the pavement. In the case of a bituminous pavement, the base may be made from either hot-paved or cold-paved asphalt (HMA). Increasingly, a percentage of recycled construction materials are being used in the production of these mixes.

In the case of a non-bituminous pavement, a mineral aggregate mixture is used for the base. This mixture can be bound with bitumen if it is heated or it can be hydraulically bound if bitumen is not used and the aggregates are mixed with cement or lime.

For cold-paved bituminous pavements, the base is usually made from a hot or cold mix of aggregate and a liquid asphalt binding agent. Typically the bituminous base mixes are comprised of aggregates from uncrushed gravel and coarse aggregate to crushed granite, recycled concrete, and/or crushed sand.

In some instances, a frost blanket is included in the base layer to insulate the base and subgrade layers from moisture action that can lead to frost damage within the pavement structure. Frost damage occurs as water within the pavement structure freezes and expands, exerting tensile stresses in the layers below it. These stresses must be relieved to avoid failure of the pavement structure.

Binder Course

A binder course is the layer that binds together aggregate and hot-mix asphalt. It is a load-bearing layer and must be strong enough to support the traffic loads for as long as several decades. The material used for the binder course varies depending on the specific use. In general, it is a mix of coarse and fine aggregates with a bituminous binder. Aggregates used for this purpose could be crushed rock, sand, gravel and/or recycled materials such as concrete, slag or reclaimed asphalt pavement (RAP). The binder is typically bitumen but in recent times other bio-based binders are also being tested.

The quality of the binder is crucial for the performance of the asphalt pavement. For this reason, shear and rut resistance testing of the asphalt binder is performed in advance of construction. This test is known as grading of asphalt binders and the results are used to establish a Performance-Graded (PG) asphalt binder specification. The shear and rut resistance tests are conducted using a rotational viscometer, COC flashpoint tester and dynamic shear and bending beam rheometers.

In addition, the PG grading system includes physical performance tests such as penetration, softening point and ductility. In order to obtain accurate shear and rut resistance results, the asphalt binder must be subjected to careful temperature control. This is because for various reasons, asphalt binders tend to harden with time.

For these reasons, this class provides the latest information about testing and grading of asphalt binders. It offers extensive hands-on lab experience that enables students to perform all required tests and make the necessary calculations. A review exam is also provided near the end of the class. This class is recommended for anyone who is responsible for asphalt testing, materials approval and specification. It is also ideal for asphalt paving contractors and engineers who want to understand the current practices in asphalt testing, grading and quality control. The course is offered in an onsite format or as an online class.

Surface Course

The top layer of the pavement structure that comes in direct contact with traffic loads, the surface course is the most critical element for a pavement to function properly. It needs to be hardy enough to resist skidding, traffic abrasion and the disintegrating effects of climate. It also needs to be tough enough to prevent distortion and prevent water from penetrating into the underlying layers.

The asphalt surface layer may be constructed in several different ways including traditional hot rolled asphalt (HMA), soft asphalt, porous asphalt or NatraTex. These materials are used in the construction of a range of infrastructure projects including footpaths, cycle paths, residential and commercial driveways and main roads.

Depending on the design of the pavement the subbase layer may be an unbound granular layer or a road asphalt base course. The function of the base course is to spread the load from the asphalt surface layer over a greater area thus reducing the overall stress on the subgrade soils and the asphalt binder layer. It also serves to minimize the intrusion of fines from the subgrade into the pavement structure and improve drainage.

The subgrade soils are under a constant amount of stress from the traffic and environmental loads, which transfer through the pavement layers. It is essential that the subgrade be well compacted to a high density and within its optimum moisture content to prevent over-stressing of the material.

Once the base and subbase courses are placed on the roadway, it is time for the paving contractor to construct the final surface course. The surfacing material of choice for most highways and major roads is HMA, sometimes known as bituminous macadam or blacktop. However, there are a wide range of alternative materials that can be used in the construction of a road or parking lot including chip seal and self-binding gravel.

The surface course is important for the durability of a pavement, and is typically constructed with aggregates that have a size distribution that will create a smooth, durable, waterproof riding surface with good skid resistance. In addition to its surface properties, the surface course is important for a pavement because it provides a strong connection between the roadbed and the traffic surface. It is also a key component in the identification of distress in a pavement, so that it can be corrected before it progresses to the underlying intermediate or binder layer.

Why Choose Asphalt Paving?

Asphalt Paving is an environmentally friendly choice. It uses less energy to produce and install, and is a more fuel efficient alternative to other materials.

Asphalt Paving

This material also helps reduce road friction, which cuts vehicle maintenance costs and lowers carbon dioxide emissions. A smoother roadway also extends its lifespan, saving taxpayer money in long run.

Asphalt paving is cheaper than concrete and can be more affordable if you add some of the available finishing options. Asphalt also takes less time to lay and is easier to maintain than concrete.

The cost of your asphalt paving is determined by the size, materials, and preparation needed to create the surface you want. A great paving contractor will make sure to provide a full estimate and warranty before beginning any work. They will also have all required licensing and insurance.

Before laying your new asphalt, the contractor will need to remove any landscaping features you have in place or existing paving material. If your home sits on a slope, the contractor may need to grade or level the area. This service is normally included with the paving job.

A new asphalt driveway can last up to 20 years if it is constructed properly and maintained regularly. However, it is important to remember that if water or gasoline are present under the surface, it can damage and shorten the lifespan of your driveway. To ensure the longevity of your pavement, it is recommended to keep up with regular maintenance and reseal the area every three to five years.

An asphalt pavement is a mixture of aggregates and binder, which bonds the hard materials together to form a solid and durable surface. The aggregates used in the mix can be crushed rock, sand, gravel or even recycled products like slags and construction and demolition debris. To bind the aggregates, bitumen is used, which can be made from natural or synthetic sources. Increasingly, waste and by-products are being used to create asphalt, which increases sustainability.

Once the asphalt mix is created it is kept hot throughout the paving process to prevent the material from drying out and cracking. The material is then loaded into dump trucks and delivered to the paving site. It is laid by a paver, which is available in wheeled and tracked versions. The paver has a hopper, feeder conveyors, distribution augers and an engine that tows a screed. The screed is what levels the asphalt and can be hydraulically adjusted to suit different applications.

It’s Durable

Asphalt surfaces are made to withstand heavy loads and the elements, lasting for decades before they require reconstruction. This durability comes from the fact that asphalt pavements can be “tailored” – appropriately formulated and designed to support the traffic load and climatic conditions of a particular road. Asphalt mixes can also be flexibly constructed to allow for thermal cycling (freezing and thawing).

Another factor that contributes to the longevity of asphalt surfaces is the elasticity of bitumen – the substance that gives asphalt its viscous nature. Unlike concrete, which can crack and crumble under the stress of repeated freeze/thaw cycles, asphalt can stretch and contract without damage. Asphalt also offers flexibility to accommodate movement of underground technical infrastructure, such as electrical and communication cables, district heating and water pipes.

The quality of the ingredients used in asphalt paving is critical to its long-life. The right combination of aggregate materials is necessary to produce an asphalt surface that will withstand the stresses and pressures of vehicle traffic and weather. Aggregates must be durable and angular, and the size of each particle needs to be carefully controlled. Moreover, the aggregates must be tested and approved against specific, rigorous standards before they can be used in an asphalt paving solution.

When constructing an asphalt pavement, the foundation layer is typically put down first. This layer is called the sub-base layer and it is usually comprised of crushed stones. It is the load-bearing layer and it must be strong enough to prevent rutting by effectively distributing traffic and environmental loading across the underlying unbound granular layers.

Once the sub-base layer is down, a binder course is laid. This layer is responsible for binding the other layers of an asphalt pavement together and it must be able to withstand high shear stresses, while at the same time providing adequate fatigue resistance.

The top layer is then placed. It is often referred to as the wearing course and it must be able to withstand the heavy vehicles and repeated impacts that are characteristic of most roads. The wearing course must also be able to withstand oxidation and weathering, and it must be able to resist the build up of water underneath the pavement that can cause heaves.

It’s Versatile

Asphalt paving is an extremely versatile construction material that can be used for many purposes. It can be used to build roads, driveways, parking lots, athletic courts, running tracks and more. Asphalt is also a very durable material and can withstand heavy traffic loads without deteriorating significantly. This durability translates into reduced maintenance costs and a long lifespan for asphalt roads and pavements.

Another benefit of asphalt is that it is less prone to cracking than other materials, such as concrete. This makes it a more cost-effective option for homeowners and businesses alike. Additionally, asphalt paving is able to be constructed quickly compared to other materials, which can help reduce the amount of time that traffic is disrupted during construction.

In addition, asphalt is much quieter than concrete and can be colored to create a variety of looks. It’s also less likely to form potholes during the winter, which can save both time and money on repairs. The smooth surface of asphalt also helps to decrease friction between tires and the road, which improves fuel efficiency.

Unlike other materials, asphalt is a mixture of different ingredients that are heated and blended together to create the final product. The most common ingredient is bitumen, which acts as a binder and unites aggregate materials such as crushed rock, sand, gravel, slags, recycled asphalt and various other types of natural or processed minerals. The different types of asphalt can be combined to create unique mixtures designed to meet the specific requirements of a paving project.

These distinct mixtures include hot mix asphalt, warm mix asphalt and cold mix asphalt. Each can be manufactured to meet a particular paving need, such as heavy traffic, weather conditions, noise reduction or waterproofing.

Warm mix asphalt is produced at a lower temperature than hot mix asphalt, which allows it to be mixed more thoroughly and applied more evenly. This process also produces fewer fumes during construction, which can be beneficial for the environment and a safer working environment for the crew.

Cold mix asphalt is produced without heating the aggregate materials, which can be useful for areas that aren’t subject to extreme temperatures. This type of asphalt isn’t suitable for high-traffic areas, however, because it can bleed and cause tracking in warm weather.

It’s Easy to Maintain

Asphalt is a durable material that can easily withstand heavy vehicle traffic and extreme weather conditions. It’s also easy to repair and maintain, making it a great choice for residential and commercial properties. It looks professional and clean, unlike some pavement options that can get stained or unattractive over time.

Before laying down the surface of an asphalt road or driveway, contractors first slope the area. This helps to prevent water from pooling in low areas. Next, a binder layer is put down. This layer is made of large aggregate mixed with oil to create a strong base for the rest of the surface.

After the binder layer is laid, a surfacing layer is placed over it. This is a mix of smaller aggregate and oil. It is then rolled and compacted to create a smooth, solid surface. Finally, the surface is cured. The curing process takes time, but once it’s finished, the asphalt is ready for use.

Aside from being cheap and durable, asphalt is also environmentally friendly. It can be recycled, which cuts down on the need for new materials and promotes sustainability. In addition, it doesn’t require as much energy to produce and transport as other paving materials, such as concrete.

One downside of asphalt is that it’s temperature sensitive. It can soften in extreme heat, which may cause ruts and bumps. However, with proper maintenance, it can be restored to a smooth, even surface.

Asphalt is a versatile material that can be made to look like bricks or stones, or it can be stained and coloured to match the surrounding environment. It’s also possible to have porous asphalt, which allows rainwater to pass through the surface into a specially prepared gravel base that can help filter it and reduce stormwater runoff.

Asphalt is an easy material to work with, so it’s not uncommon for contractors to be able to lay the whole surface of a road or parking lot while you’re at work or asleep. This can be done quickly, without disrupting traffic. It’s also much easier than other paving methods, which can lead to lengthy construction periods and traffic delays.

post

Paver Installation Guide

If you plan to install pavers, make a scaled drawing to help with the layout. Also, check with the local utilities locate service to ensure that you don’t hit or obstruct pipes or cables during construction.

Start with a layer of coarse, crushed stone base and pour a bed of sharp-angled bedding sand over the entire area. Use a level to maintain straight rows and occasionally tamp down the sand.

Laying the Base

The paving base is the foundation of your paver project. It helps to keep your pavers in place, allows for drainage and is essential for a successful hardscape installation. A paver surface without a solid base will shift and eventually break apart. There are many different types of paver bases, each designed to suit a specific use or environment. For example, crushed stone is an excellent option for high traffic areas while sand works best for pedestrian projects.

After excavating the space and removing existing materials, you’ll install and compact the base layer in 2-4” layers. The amount of base required depends on the size and type of paver used, as well as the soil conditions. For example, wet and clay soils may require more excavation and a thicker base material than dry or sandy soils.

Once the base is laid, it’s time to add the bedding sand. This sand is similar to beach sand but is sharp and angular. This will help the sand lock into the joints between your pavers, creating a strong and durable surface.

Before you begin laying the sand, you’ll need to mark out your paved area with stakes and string. This gives you a reference point for when you’re installing the pavers and allows you to see how your project will look once it’s complete. You’ll also want to make sure to mark off utility lines in the area you’re working. This is a good idea for any type of construction or landscaping project, but is particularly important for paver installations. You can find information on locating buried pipes and cables by calling 811.

After marking the paver area, pour in your bedding sand. You can purchase sand bags but it’s usually easier and cheaper to have bulk sand delivered and spread on site. Use a screed board or other device to drag over the sand and smooth it out. This step is important to ensure that the sand is perfectly flat and even, and ready for the pavers.

While you’re working, it’s important to tamp the sand and base material regularly with your plate or tamper. This will ensure that there are no air pockets, which can cause the paving stones to shift later on and lead to sunken or raised pavers.

Preparing the Sub-Base

The first step in a hardscape installation is to excavate the soil that will be used for the base of the pavement. It’s important that this step is done correctly to avoid failure in the future. This is because any structure, including a paver patio, walkway or driveway, is only as good as its foundation. During this stage it’s important to check with your local utility company before digging, so you can avoid striking buried gas, water or electrical lines.

Once the excavation is complete, it’s time to install a layer of aggregate and then a layer of bedding sand. The exact amount of each material you need will depend on the type of paving project you’re working on. For example, patios only need 6″ of aggregate base, whereas residential driveways require 10″. Use a wheelbarrow or dump truck to deliver the appropriate amount of material and spread it evenly with a landscape rake or trowel. Then, use a plate compactor to compact the material. Make sure to wear work gloves, safety glasses and hearing protection when using a plate compactor.

In most cases, it’s necessary to add a geotextile fabric to the top of the aggregate and sand layers before proceeding with the paver installation. This is because the fabric will help prevent weed growth and allow for proper drainage. Once the geotextile is in place, a sand bed is added to the surface of the base, and then the paver stones are laid on it.

During the laying process, it’s also recommended that you use a plate compactor to secure each paver in place. This will ensure that the pavers stay firmly in place, and it will also minimize any movement between each one.

It’s also a good idea to install edge restraints, such as concrete, edging stones or plastic paver edging products. These are designed to keep the pavers in a stable position and will prevent them from moving or separating over time. If you’re working on a large paved area, it’s also a good idea to lay a layer of road base aggregate at the bottom of the sand bed to help prevent any settling.

Laying the Pavers

Whether you’re installing a patio, walkway or driveway, the first step is the same: dig out any existing material to the appropriate depth. It’s a good idea to use stakes, marking paint or a garden hose to outline your work area as you dig. This makes it easier to keep the excavation tidy and helps prevent you from digging into your utilities or pipes.

Once the excavation is complete, spread and compact your paver base to a thickness of about four inches. You can rent a plate compactor to make the process much quicker and easier, but it’s important to wear protective gear to avoid a back injury or hearing loss. Also, only take partial shovel loads and always lift from your legs. Be sure to tamp each layer down, and remember that the base should have a slight slope. This allows water to run off the surface, rather than pooling.

Next, lay a layer of sharp angled bedding sand over the entire paver base. This sand isn’t the same as beach sand and has a rougher texture, which is perfect for locking into paver joints. It’s important to follow the manufacturer’s instructions regarding the amount of sand you should use. Too little and the pavers will move around, too much and they will become slick underfoot.

When you’re ready to begin laying the pavers, it’s helpful to use a tape measure and a square to ensure that your project is square. This will help prevent the pavers from settling unevenly over time and it will also keep them looking their best.

Begin laying the pavers one at a time, using a level to check their positioning and making any necessary adjustments. After each paver is laid, fill in any gaps with more coarse bedding sand. Be sure to leave a space for the edge restraints, which should be placed at each corner of the paving area.

Once all of the pavers are in place, a final layer of bedding sand should be added and tamped down to lock in the new surface. After the sand is tamped, a paver sealer can be applied to protect the new surface from weathering and staining.

Finishing the Pavers

As with any paving project, it is very important to take the time to carefully plan the work. It is recommended that you use a tape measure to help plot out the area you are going to resurface and note its square footage. Then, purchase 10% more pavers than your estimate to account for breakage and replacements. Before starting any excavation, it is a good idea to check with the local utilities company by calling 811, also known as 1-800-889-7627. This will allow them to come out and mark the areas where there are pipes and cables. This will protect you from accidentally striking and damaging them during construction.

Once the base is excavated, it is tamped and leveled to ensure proper drainage. Then, a layer of gravel is placed to protect the granular base from being contaminated by clay-like soils that can cause problems later on. A layer of sand is then placed on top of the gravel. It is very important that this sand is not packed down and is spread out evenly over the entire surface. It should be within 1/8″ of the top of the pavers if they have a bevel on them. This will ensure that the sand is not even with the top of the pavers and allows for proper “lock up” of the joints.

Next, the pavers are laid. Start at one edge and work toward the other. Set them lightly on the sand and do not press or hammer them in. Every 4 feet pull a string line across the laying face of the pavers to maintain straight lines. If a paver needs to be cut, use a diamond blade wet saw or a paver splitter and cut it to the desired size. Finally, install an edge restraint around all edges that do not butt up to a permanent structure like a wall or kerb.

Once the paving is finished, sweep a light coating of joint filling sand over it. This will help to further prevent lateral movement of the pavers and sand bedding. It is also a good idea to run a plate compactor over the surface once it has been swept. This will help to set the pavers into their bedding sand and further enhance the interlock between them.